How to Build a Full PC in Bangladesh: Complete PC Build Guide for Beginners
How to Build a Full PC in Bangladesh: Complete Step-by-Step Guide for Beginners
Building your own desktop computer gives you the absolute best value for your money. This comprehensive guide walks you through part selection, local component sourcing, compatibility verification, and the physical assembly process in Bangladesh.
Building a custom computer allows you to handpick high-quality internal parts. You will avoid the cheap, unbranded power supplies and slow storage drives often found inside prebuilt systems.
What This Guide Covers
- Part Selection: Finding the right CPU, GPU, motherboard, and storage configuration.
- Compatibility Check: Ensuring all chosen hardware pieces fit and function together perfectly.
- Step-by-Step Assembly: Detailed, beginner-friendly instructions for putting the hardware components together.
- Local Market Insights: Navigating warranties, physical shops, and regional pricing realities.
Key Milestones for Your PC Build
- Phase 1: Setting your total budget and choosing a main use case.
- Phase 2: Purchasing matching components from reliable local distributors.
- Phase 3: Preparing a clean workspace and gathering necessary installation tools.
- Phase 4: Assembling the main hardware components inside the computer casing.
- Phase 5: Managing cables, verifying the first boot, and installing your operating system.
Why Build Your Own PC Instead of Buying a Prebuilt System?
Building a custom PC maximizes your performance per Taka, provides an easy upgrade path, and guarantees high-quality individual components. Prebuilt desktop computers sold in local markets often cut corners on critical parts like power supplies and motherboards to increase profit margins.
Better Performance Per Taka
Prebuilt computers carry an assembly markup fee that inflates total retail prices across retail shops in Bangladesh. Buying separate components ensures every single Taka goes directly toward hardware performance.
- No Assembly Markup: Avoid paying thousands of Taka in hidden prebuilt assembly fees.
- Balanced Allocations: Spend money on the exact parts that increase framerates or rendering speeds.
- No Unwanted Software: Custom installations eliminate resource-heavy bloatware programs that slow down standard factory systems.
Easier Future Upgrades
Custom computers utilize standard component form factors that make changing parts simple as technology advances. Prebuilt systems often use proprietary motherboard sizes or weird case designs that prevent standard desktop upgrades.
Component | Custom PC Ecosystem | Prebuilt System Limits |
Motherboard | Standard ATX or Micro-ATX frames | Proprietary shapes or screw layouts |
Power Supply | Standard ATX cable extensions | Proprietary shapes and non-standard pin configurations |
Case Space | Clear clearance metrics for long graphics cards | Cramped designs that block dual-fan graphics cards |
Better Component Quality Control
You choose the exact manufacturer brand for every internal part when assembling a custom computer configuration. Prebuilt manufacturers regularly use unbranded, cheap power supplies that threaten system stability during local voltage fluctuations.
- Power Supply Security: Handpick an 80 Plus certified power supply unit to handle frequent load-shedding events safely.
- Storage Speeds: Choose high-speed NVMe solid-state drives instead of cheap, slow storage alternatives.
- Cooling Efficiency: Select a dedicated aftermarket tower air cooler to combat hot and humid summer seasons.
Long-Term Cost Savings
A custom desktop computer lasts longer because you can upgrade minor individual elements instead of replacing the entire system. This flexibility saves tens of thousands of Taka over a typical five-year computing lifecycle.
- Year 1: Initial Build
- Year 3: Swap Graphics Card Only
- Year 5: Add Extra Storage Drive
Choosing a modern motherboard platform like AMD AM5 guarantees years of processor upgrade compatibility without requiring an expensive motherboard replacement down the line.
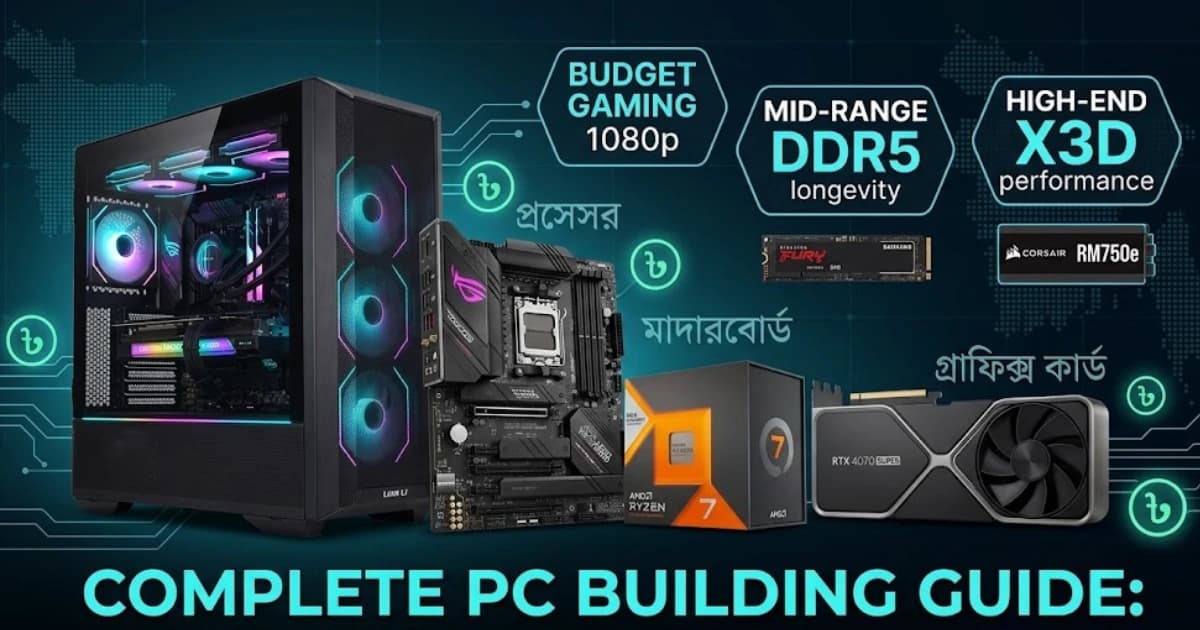
What Components Do You Need to Build a Complete PC?
A functional desktop computer setup requires twelve distinct hardware and software components to operate properly. Each part handles a specific system task, from processing raw application calculations to keeping the sensitive internal microchips cool
Processor (CPU)
The Central Processing Unit serves as the main biological brain of your entire desktop computer setup. It executes operational code commands and processes foundational computational logic data for your operating system and programs.
Motherboard
The motherboard operates as the central nervous system spine linking all individual hardware components together. It distributes electric power from the power supply and routes vital data signals between the processor, memory, and graphics hardware.
Graphics Card (GPU)
The graphics processing unit handles massive visual computations to render images, video files, and detailed gaming environments onto your display screen. High-performance gaming and video rendering workloads require a robust, dedicated graphics card expansion board.
RAM
Random Access Memory stores temporary runtime execution data that your active software programs require instantly. Higher memory capacities enable smooth application multitasking and prevent stuttering lag spikes during intense gaming sessions.
SSD or HDD Storage
Storage drives securely retain your operating system files, software programs, game libraries, and personal digital archives permanently. Solid-state drives deliver vastly superior read speeds compared to old mechanical hard disks.
Storage Class | Primary Benefit | Ideal Target Placement |
NVMe SSD | Ultrafast data access | Operating system installation, primary apps, active gaming titles |
SATA SSD | Affordable flash storage | Secondary game libraries, active project archives |
Traditional HDD | Maximum data capacity | Cold bulk storage, high-volume video backups, legacy document archives |
Power Supply Unit (PSU)
The power supply unit converts alternating current utility grid power down into stable direct current energy for delicate microcomponents. Investing in a highly certified power unit protects internal circuitry from sudden local high-voltage spikes.
PC Case
The computer casing chassis houses, secures, and protects your internal electronic components from physical environmental damage. Proper chassis selection directly dictates the total size and structural physical compatibility layout of your final build.
CPU Cooler
Processors generate massive thermal energy heat output immediately when processing demanding application operations. A dedicated air cooling tower or a liquid radiator setup dissipates this thermal heat away to protect your processor from melting down.
Casing Fans
Dedicated chassis fans force continuous refreshing cool air currents into the front of the computer enclosure. Simultaneously, rear exhaust fans actively eject trapped hot ambient air back out into your room.
Monitor
The monitor display screen visually presents the graphic output processed by your internal graphics hardware. Modern desktop monitors vary widely by display panel technology, overall physical resolution sizing, and maximum refresh rates.
Keyboard and Mouse
The keyboard and mouse serve as your core hardware interface tools to type text and navigate user interfaces smoothly. Gamers and professional copywriters usually prioritize mechanical keyboard switches for superior tactile click feedback.
Operating System
The operating system software coordinates the entire digital communication framework between your physical hardware parts and software applications. Windows remains the dominant consumer desktop platform choice for compatibility across modern game storefronts.
Understanding How a PC Works Before You Build One
A desktop computer functions as a synchronized ecosystem where individual hardware parts constantly exchange electrical signals to process tasks. Understanding this internal communication network helps you diagnose performance bottlenecks and avoid assembling incompatible hardware components.
Communication Between Components
Every hardware component relies on the motherboard to establish a clear connection with the central processing unit. The motherboard contains microscopic copper circuit pathways called traces that form dedicated data highways across the circuit board.
- The PCIe Lanes: High-speed data highways linking the graphics card and NVMe storage drives directly to the processor for instant processing.
- The Motherboard Chipset: A dedicated silicon controller on the motherboard acting as a traffic cop for slower data signals like USB ports and audio jacks.
- The System Bus: The internal communications bridge connecting the processor directly to the rapid-access system memory slots.
Data Flow Inside a Computer
Data moves through a strict hierarchy based on operational processing speed when you open a software application or load a video game. The system constantly shifts information between your permanent storage drives and active processing units.
Component | Role / Action | Next Destination |
Storage: NVMe SSD | Loads Data | System Memory: RAM |
System Memory: RAM | Holds & Feeds Data | Processor: CPU/GPU |
Processor: CPU/GPU | Processes Data | End Cycle |
- Retrieval: The processor requests software files, which are pulled out from your slow permanent solid-state drive or hard disk drive.
- Staging: The retrieved application data moves into the ultra-fast system RAM so the processor can access the instructions without waiting.
- Execution: The CPU processes the core logic calculations while sending visual rendering data pipelines straight to the graphics card for screen display.
Importance of Compatibility
Hardware components cannot communicate unless they share identical electronic signaling protocols, matching physical slot dimensions, and firmware support parameters. Forcing incompatible parts into a motherboard will cause permanent, expensive physical damage to the electrical pins.
Compatibility Risk | Potential Failure Point | Preventative Checklist Action |
Socket Mismatch | CPU cannot fit into motherboard | Cross-check AMD or Intel socket designations explicitly |
RAM Generation Change | DDR4 modules cannot fit DDR5 slots | Verify exact memory type generation supported by the motherboard |
Power Supply Limits | PC shuts down under gaming loads | Calculate total system wattage draw and add a safety margin |
Step 1 – Choose the Right Processor for Your Build
Selecting the central processing unit dictates your entire computer build path because it determines your motherboard options and memory generation compatibility. You must choose a processor that balances active core counts, clock speeds, and local retail pricing to match your specific daily workloads.
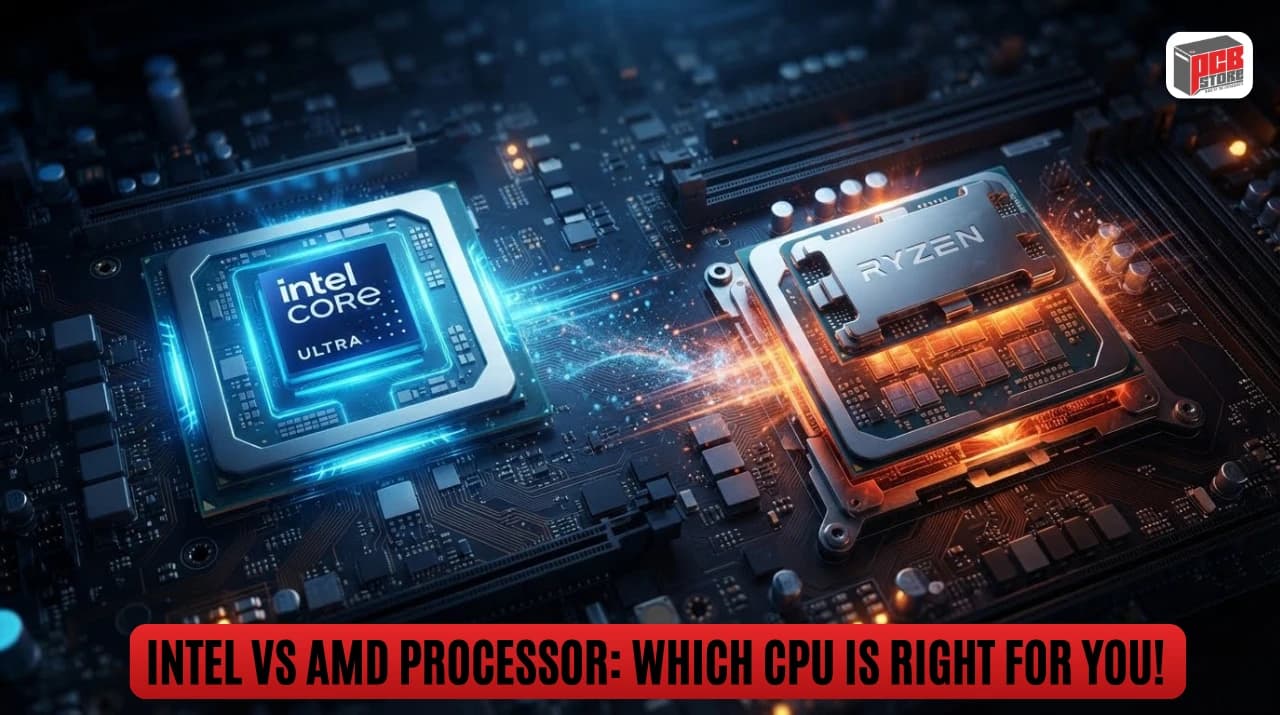
AMD vs Intel in 2026
The processor market features a competitive rivalry between AMD Ryzen platforms and Intel Core processors. AMD utilizes its long-lived AM5 motherboard platform, whereas Intel fields its LGA1851 socket ecosystem for current-generation processors.
- AMD Ryzen Advantages: Outstanding power efficiency, lower thermal output, and guaranteed motherboard socket upgrade support spanning multiple years.
- Intel Core Advantages: Highly competitive pricing on budget options and high thread counts from an architecture combining performance and efficiency cores.
Core Count Explained
Cores represent the individual physical processing units packed inside a single silicon processor chip. Having more cores allows your computer to handle multiple demanding background applications at the exact same time without slowing down.
- 4 to 6 Cores: Perfect for basic office tasks, everyday web browsing, student projects, and budget-conscious gaming configurations.
- 8 Cores: The modern sweet spot for high-frame-rate gaming, live streaming, and introductory video editing workloads.
- 12 to 16+ Cores: Required for heavy professional workloads like 4K video rendering, 3D modeling, and local AI development.
Clock Speed Explained
Clock speed measures how many calculation cycles a single processor core can execute within one second, calculated in Gigahertz. Higher clock speeds mean snappier software responsiveness and faster processing times for individual application tasks.
Base clock speed indicates the guaranteed operational speed under standard workloads, while boost clock speed represents the maximum velocity a processor can reach during intensive tasks if the cooling system keeps temperatures low.
Gaming vs Productivity CPUs
Video games and professional productivity software handle processor resources differently, which changes what specs you should prioritize.
Workload Type | Key Hardware Priority | What to Look For |
Gaming Focus | High single-core speeds and large internal L3 cache volumes | Processor lines like AMD X3D models |
Productivity Focus | High multi-core counts and heavy multi-threaded compute density | High-end Intel Core i7/i9 or AMD Ryzen 9 series |
Best CPU Choices by Budget
Local tech markets feature strong processor availability across multiple price tiers, giving you good options regardless of your budget.
- Entry-Level Tier: AMD Ryzen 5 5600 or Intel Core i3-14100 offer great performance for budget gaming setups under 12,000 BDT.
- Mid-Range Tier: AMD Ryzen 5 7600 or Intel Core i5-14600K provide smooth frame rates and fast editing workflows around 20,000 to 28,000 BDT.
- High-End Tier: AMD Ryzen 7 7800X3D or Intel Core i7-14700K serve as top-tier choices for enthusiast configurations above 40,000 BDT.
Step 2 – Select a Compatible Motherboard
Choosing the perfect motherboard requires matching the physical socket architecture of your chosen processor while locking in necessary connectivity features. Your motherboard selection directly establishes your computer's total storage expansion potential, memory limits, and physical casing size requirements.
Socket Compatibility
The physical CPU socket on the motherboard must perfectly match your chosen processor line or the system will not assemble. AMD and Intel use completely distinct, physically incompatible socket layouts that change across hardware generations.
- AMD AM5 Socket: Supports Ryzen 7000, 8000, and 9000 series processors. AMD formally guarantees AM5 platform expansion support through 2029, offering an easy path for future processor drops.
- Intel LGA1851 Socket: Built specifically for the newer Core Ultra 200S series processors. This physical pin layout replaces the older LGA1700 generation socket used on 12th through 14th Gen chips.
Chipset Comparison
The motherboard chipset dictates the underlying feature sets, system overclocking capabilities, and total high-speed data lanes available across the board.
- Enthusiast Tier (X870E / Z890): Offers maximum high-speed PCIe 5.0 lane distributions, native high-bandwidth USB4 support, and unrestricted manual tuning capabilities for premium desktop configurations.
- Mainstream Tier (B850 / B860): Represents the ultimate cost-to-performance sweet spot for mainstream builders in Bangladesh. You retain full memory speed tuning without paying a premium price.
- Entry-Level Tier (A620 / H810): Restricts data transfer pipelines down to basic PCIe 4.0 speeds. These budget boards lack heavy-duty cooling heatsinks, making them ideal for lower-power office builds.
Expansion Options
A motherboard's physical size determines its total physical expansion slots and permanent storage drive capacities.
- ATX Size: Full-sized circuit boards that offer up to four discrete M.2 NVMe solid-state storage slots alongside multiple secondary PCIe slots for expansion cards.
- Micro-ATX Size: A compact, highly popular form factor in the local market that reduces overall motherboard height while offering excellent value inside smaller computer cases.
- Mini-ITX Size: Extremely small boards measuring just 170 by 170 millimeters, tailored for specialized, ultra-portable computer builds.
WiFi vs Non-WiFi Boards
Deciding between a motherboard with built-in wireless hardware or a traditional wired-only configuration impacts your clean workspace aesthetics and long-term networking flexibility.
- Integrated Wireless Boards: Feature built-in Wi-Fi 6E or Wi-Fi 7 chips alongside Bluetooth connectivity, eliminating extra adapter dongles to sync wireless game controllers or audio gear.
- Non-WiFi Standard Boards: Require a direct physical Ethernet cable connection to access internet networks. These variants save several thousand Taka at retail counters compared to wireless editions.
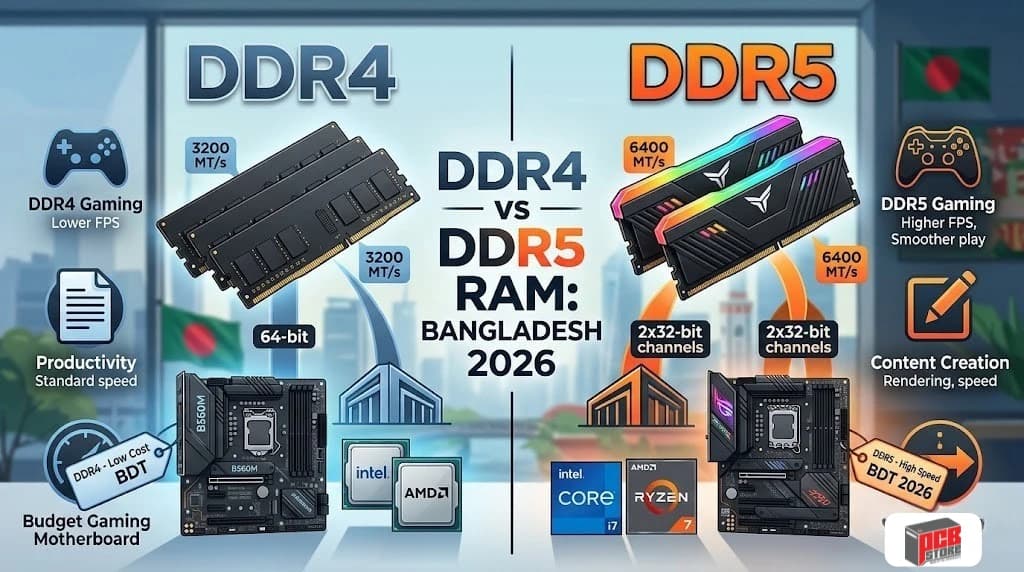
DDR4 vs DDR5 Support
Current-generation motherboard platforms have shifted to completely exclusive memory generation architectures.
- The Modern Standard: Current AM5 motherboards and LGA1851 mainstream sockets exclusively accept high-speed DDR5 memory sticks. They do not feature physical or electrical backwards compatibility with older memory modules.
- Legacy Options: If you are building a budget-conscious setup using older hardware like AMD AM4 or Intel LGA1700, you can opt for affordable DDR4 motherboards to lower your total system cost.
Step 3 – Choose the Right Graphics Card
Selecting the correct graphics processing unit directly determines your computer's visual rendering speeds and structural real-time frame rates. You must match your specific screen resolution targets with a graphics hardware card that has sufficient memory capacity and physical slot clearance inside your computer case.
Do You Need a Dedicated GPU?
Budget builders can completely skip a dedicated graphics card if their primary tasks focus on office productivity, attending online classes, or browsing web pages.
- Integrated Hardware: Processors ending in AMD "G" or standard Intel chips contain built-in display hardware. These chips process basic video tasks by sharing your primary system RAM, saving considerable budget.
- Dedicated Hardware: Separate graphics expansion cards utilize specialized, high-speed independent visual memory. You absolutely require a dedicated card to handle competitive multiplayer gaming, rendering 3D assets, or editing high-definition drone footage.
Gaming Resolution Requirements
Your physical display monitor resolution directly dictates how hard your internal graphics processor must work to render smooth frame rates.
- 1080p Target: Standard High Definition displays require less processing overhead. Mainstream budget hardware delivers ultra-smooth frame rates on these traditional panels.
- 1440p Target: Quad High Definition displays demand vastly increased pixel calculations. You will need higher mid-tier graphics hardware to maintain smooth pacing at this resolution level.
- 4K Target: Ultra High Definition displays require processing massive visual calculations every single second, necessitating premium enthusiast-tier graphics hardware.
VRAM Requirements
Video Random Access Memory serves as the local high-speed holding zone for game textures and complex 3D asset maps. Running modern applications with insufficient video memory triggers sudden, severe frame drop stuttering as your PC forces data onto your slower system storage.
- 8GB VRAM: The baseline entry point for competitive esports titles and mid-range gaming at standard 1080p resolution configurations.
- 12GB VRAM: The modern sweet spot requirement to enjoy smooth, high-texture settings at 1440p resolution without hitting hardware limits.
- 16GB or More: Essential for smooth professional 4K production workloads, complex texture rendering paths, and processing local machine learning code models.
Ray Tracing and AI Features
Modern graphics architectures rely heavily on automated intelligent upscaling protocols to artificially boost your visible frame rates without draining extra power.
- NVIDIA DLSS: Deep Learning Super Sampling utilizes dedicated hardware tensor cores to reconstruct lower-resolution images into crisp, high-definition outputs with superior clarity.
- AMD FSR: FidelityFX Super Resolution provides open-source spatial upscaling support across diverse hardware platforms without locking you into a specific manufacturer brand.
- Ray Tracing: Simulates physical light paths, bounce reflections, and accurate ambient shadows in real-time, though turning it on drastically reduces overall frame pacing.
GPU Recommendations by Budget
The local market offers reliable graphics choices across distinct pricing tiers, allowing you to select hardware that fits your target build sheet.
- Entry-Level (Under 30,000 BDT): The AMD Radeon RX 6600 offers outstanding raw 1080p performance per Taka, outclassing older entry-level alternative models.
- Mainstream (35,000 to 50,000 BDT): The Intel Arc B580 or NVIDIA GeForce RTX 4060 provide highly competitive modern architectures featuring strong AI acceleration and smooth 1080p to 1440p capabilities.
- Enthusiast (Over 65,000 BDT): Premium choices like the NVIDIA GeForce RTX 5060 Ti or higher-tier enthusiast models provide maximum frame rates, cutting-edge generational architectures, and high VRAM pools.
Step 4 – Select RAM Without Overpaying
Selecting system memory requires balancing total capacity, operational frequencies, and structural latency timings to maximize data pipelines without overpaying for unnecessary performance tiers. Buying high-speed memory kits requires checking your motherboard Qualified Vendor List to guarantee system boot stability.
How Much RAM Do You Need?
Your total memory capacity directly dictates how many concurrent application tasks and background browser tabs your desktop computer can hold in active memory before throwing out errors.
- 16GB Capacity: The standard budget baseline for entry-level office productivity, basic photo touch-ups, and running light esports gaming titles comfortably.
- 32GB Capacity: The modern performance sweet spot requirement for high-end AAA gaming configurations, hosting live streams, and handling 1440p video editing projects.
- 64GB or More: Highly essential for professional workflows including processing 4K production footage, running massive virtual software environments, and training local AI language data models.
RAM Speed Explained
Memory speed indicates how much raw digital information the stick can transfer over to the central processor every second, measured across raw Megatransfers per second (MT/s). However, you must pair speed with low CAS Latency (CL)—which represents the structural time delay before a memory module responds to a processing request.
A DDR5 memory kit rated at 6000 MHz with tight CL30 latency timings responds faster and offers smoother minimum frame rates than an excessively fast 7200 MHz kit with slow CL40 latency timings.
DDR4 vs DDR5
Modern memory architectures feature entirely different physical notch placements, structural operating voltages, and data bus management setups that prevent them from sharing physical slots.
- DDR4 Legacy Modules: Operate at lower baseline frequencies spanning 3200 MHz to 3600 MHz. While highly affordable, they restrict modern platform upgrade options.
- DDR5 Current Generation: Delivers massive high-bandwidth performance starting at 5600 MHz up to 6400 MHz. DDR5 integrates on-die power management chips directly onto the memory module to increase system efficiency.
Dual Channel vs Single Channel
Always purchase a memory kit containing two identical, factory-matched sticks instead of installing a single high-capacity stick. Running two modules activates a dual-channel 128-bit wide data bus that doubles total memory bandwidth.
Configuration | Bus Width | Impact on Performance |
Single Module (1x 32GB) | Slower 64-bit Bus | Bottlenecks Processor Data Flow |
Dual Modules (2x 16GB) | Faster 128-bit Bus | Doubles Memory Bandwidth Performance |
- Single-Channel Bottlenecks: Installing one memory stick forces all processor requests through a narrow pipeline, which cuts minimum gaming frame rates by up to 15%.
- Dual-Channel Performance: Splitting your memory capacity across two matching slots instantly stabilizes your frame delivery pacing and accelerates heavy media rendering tasks.
Step 5 – Pick the Best Storage Configuration
Selecting the perfect storage layout requires combining ultra-fast flash solid-state drives for your operating system with affordable, high-capacity secondary mechanical options for archival backup data. Modern storage configurations rely heavily on direct motherboard slot mount points that eliminate traditional data transmission cables.
SSD vs HDD
Solid-state drives utilize stable flash electronic chips to access operational files almost instantly without requiring any moving internal parts. Mechanical hard disk drives rely on spinning magnetic platters and moving read heads that bottleneck modern software performance.
- Solid-State Drives: Accelerate system startup boot times down to mere seconds while removing performance-stuttering lag spikes within heavy software applications.
- Hard Disk Drives: Provide exceptionally low financial costs per gigabyte of data stored, though they remain far too slow to run modern operating systems smoothly.
SATA vs NVMe SSD
The underlying communication protocol interface dictates the ultimate speed ceiling of your solid-state hardware drive.
- SATA Storage Interface: Connects via traditional data cables or older flat card slots, capping maximum read speeds around 550 Megabytes per second.
- NVMe Storage Interface: Mounts directly into dedicated motherboard sockets to tap into PCIe lanes, pushing raw data transfer speeds well past 3,500 Megabytes per second.
PCIe Gen3 vs Gen4 vs Gen5 SSDs
Selecting your NVMe generation alters the maximum read boundaries of your drive, assuming your motherboard chipset provides matching support.
- PCIe Gen3 Generation: Delivers standard data transfer thresholds maxing out around 3,500 Megabytes per second. This remains an exceptionally reliable, cheap choice for budget builds.
- PCIe Gen4 Generation: Doubles performance boundaries up to 7,500 Megabytes per second, serving as the recommended standard sweet spot for modern mainstream gaming rigs and video editing platforms.
- PCIe Gen5 Generation: Pushes data bandwidth limits toward an extreme 14,000 Megabytes per second. These premium drives run hot and require heavy-duty thermal heatsinks alongside premium pricing structures.
Recommended Storage Capacities
Local availability spans diverse storage tiers to match individual project use cases.
- 512GB Capacity Baseline: Represents the absolute bare minimum configuration for a general office computer. This accommodates your primary operating system alongside essential workplace productivity utilities.
- 1TB Capacity Sweet Spot: The recommended configuration standard for intermediate gaming setups. This capacity comfortably fits modern gaming libraries alongside active digital media projects.
- 2TB or Greater Volume: Crucial for creative production specialists managing high-definition asset archives or professionals working regularly with massive database deployments.
Data / Use Case | Recommended Drive Type | Suggested Capacity |
System Boot & Main Apps | High-speed NVMe M.2 SSD | 1TB |
Bulk Media & File Backups | Affordable Traditional HDD | 2TB to 4TB |
Always check whether your chosen NVMe drive model includes an integrated DRAM cache chip. Solid-state drives containing local DRAM manage file indexing tasks far better, preserving high write speeds during heavy file copies.
Step 6 – Choose a Reliable Power Supply
Your power supply unit functions as the literal heart of your desktop computer, converting utility grid electricity to clean power. Investing in a top-tier power supply shields your expensive internal microchips from frying during sudden local voltage drops or seasonal load-shedding.
PSU Wattage Calculator
Purchasing a power unit requires adding up the continuous power consumption demands of your processing hardware and adding a safety margin. A healthy overhead ensures your power system operates efficiently without overheating during maximum application workloads.
- Mainstream Gaming Rig (RTX 4060 + Ryzen 5): Pulls around 300 watts under maximum load. A certified 550W to 650W power supply provides an ideal performance cushion.
- High-End Enthusiast Setup (RTX 5070 + Ryzen 7): Demands significantly heavier power pipelines. You should prioritize a premium 750W to 850W power unit.
- Calculation Rule: Total the official thermal design power specifications of your processor and graphics card, then multiply that value by 1.5 to establish your baseline wattage target.
80 Plus Ratings Explained
The 80 Plus certification standard verifies how efficiently a power unit converts wall socket alternating current down into usable computer direct current. Higher efficiency design layers minimize internal heat wastage inside the power supply box while shaving money off your monthly utility bills.
- 80 Plus Bronze: Represents the standard budget baseline layer. It guarantees up to 85% operational efficiency under typical office and gaming loads.
- 80 Plus Gold: Serves as the modern sweet spot for mainstream custom computers, delivering up to 90% power conversion efficiency.
- 80 Plus Platinum / Titanium: Premium engineering classes tailored for heavy production servers or extreme overclocking configurations where every watt counts.
Modular vs Semi-Modular vs Non-Modular
The physical cable management architecture layout alters how easily you can route power lines cleanly through your chassis frame.
Power Supply Design Type | Cable Framework Setup | Airflow and Management Impact |
Fully Modular | Every single cable detaches completely from the main power housing box | Excellent; connect only the essential power lines you need to save massive space |
Semi-Modular | Core motherboard and processor lines are permanently fused; all secondary accessory peripheral cables detach | Highly balanced; provides clean building paths since the non-detachable lines are mandatory anyway |
Non-Modular | Every single power cable bundle is permanently soldered straight into the internal circuit box | Difficult; forces you to bundle and hide massive clusters of unused mesh cables inside the chassis basement |
Common PSU Buying Mistakes
Avoiding critical power supply purchase pitfalls saves your custom computer configuration from sudden system blackouts or hardware degradation over time.
- Buying Unbranded "Casing PSUs": Cheap unbranded power units included free with budget cases lack vital safety cut-off fuses. They regularly explode under heavy gaming loads, destroying your motherboard.
- Ignoring the Cybernetics Standard: Modern builders should look for Cybenetics efficiency and noise certifications alongside legacy 80 Plus badges to verify real-world acoustic performance.
- Skipping ATX 3.0 or ATX 3.1 Standards: If you are buying a current-generation graphics card, ensure your power unit natively supports the ATX 3.0 framework. This includes the dedicated 12VHPWR power cable to prevent connector melting risks.
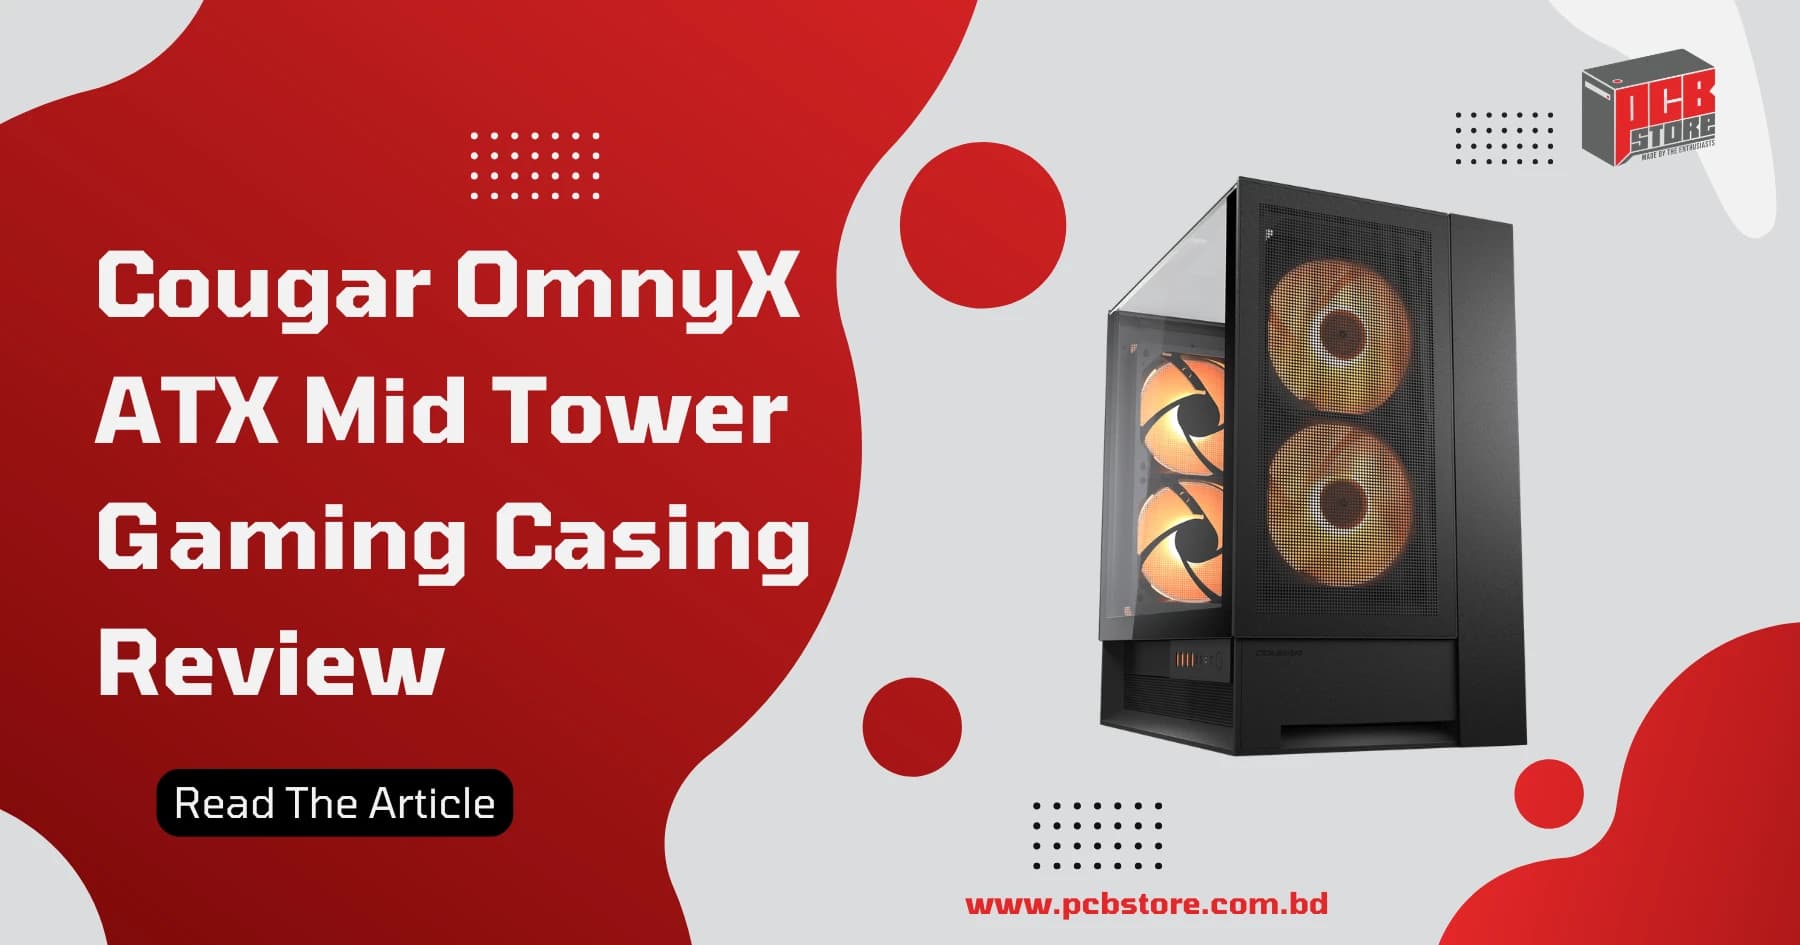
Step 7 – Select a PC Case with Proper Airflow
Selecting the right computer casing involves balancing physical component clearance, aesthetic style choices, and optimal airflow mechanics. Your chassis choice must easily accommodate the physical length of your graphics card and provide unrestricted breathing room to keep your components cool during humid weather.
ATX vs Micro-ATX vs Mini-ITX Cases
The structural form factor of a computer case determines the maximum motherboard size it can hold and sets limits on your overall physical building space.
- ATX Mid-Tower/Full-Tower: The most versatile chassis standard, offering ample room for large motherboards, long graphics cards, and dual-fan liquid cooling systems.
- Micro-ATX Mini-Tower: A compact option that balances internal space with a smaller desk footprint, making it the top value choice in the local market.
- Mini-ITX Small Form Factor: Specialized, ultra-compact enclosures that require precise part selection and complex cable routing.
Airflow vs Aesthetics
Modern computer cases generally lean toward either maximum ventilation performance or sleek, showcase visual designs.
- Mesh Front Panels: Prioritize pure thermal performance by using thousands of tiny perforations to pull cool air directly across your hot components.
- Dual-Chamber "Aquarium" Cases: Use seamless wrap-around glass panels to showcase your interior hardware. While visually striking, they require strategic side or bottom intake fan placement to prevent internal heat traps.
Case Front Panel | Airflow Behavior | Thermal Impact |
Mesh Front Panel | Pulls fresh air straight across internal components | Lower hardware temperatures |
Solid Glass Front | Blocks direct air pathways entirely | Traps radiant internal heat |
Tempered Glass Considerations
Tempered glass side panels offer a crystal-clear look at your internal hardware, but they require careful handling during assembly.
- Thermal Traps: Avoid solid glass front panels that completely choke your intake fans, forcing them to gasp for air through tiny side slits.
- Explosion Risks: Always place your case on a soft towel or wooden desk during assembly. Dropping a tempered glass panel onto hard tiled floors can cause it to shatter instantly due to surface tension.
Future Upgrade Space
A high-quality computer case outlasts multiple generations of internal hardware upgrades if you plan your clearance parameters wisely.
- GPU Length Clearance: Ensure the case leaves at least 340 millimeters of horizontal space to accommodate extra-long triple-fan graphics cards.
- Cooler Height Clearance: Verify the vertical CPU cooler clearance extends past 160 millimeters so large tower air coolers don't hit the side glass panel.
- Radiator Mount Options: Prioritize cases that support a 240-millimeter or 360-millimeter liquid cooling radiator along the top panel to handle future high-power processor upgrades.
Step 8 – Choose the Right Cooling Solution
Selecting an effective CPU cooling solution keeps your processor within safe operating temperatures and prevents performance thermal throttling. Your choice depends directly on the total heat output of your processor and the ambient temperature of your room during the hot summer months.
Stock Coolers
Many entry-level and mainstream processors include a basic factory cooler inside the retail box to save you money on your initial build.
- Ideal Use Cases: These basic metal coolers handle locked, non-overclocked processors perfectly fine during basic office tasks, web browsing, and casual gaming.
- Limitations: They run noticeably louder under heavy processing loads and lack the thermal capacity to handle high-end gaming chips or long video rendering tasks.
Air Coolers
Aftermarket tower air coolers use thick copper heat pipes to pull thermal energy up away from the processor into a large array of aluminum fins.
- Value and Reliability: Large dual-tower air coolers offer fantastic cooling performance per Taka, often matching expensive liquid coolers while remaining cheaper.
- Zero Failure Risks: Mechanical air coolers are incredibly reliable because they have no liquid pumps that can fail or leak—you only ever need to replace a fan if it wears out.
AIO Liquid Coolers
All-In-One (AIO) liquid coolers use a closed loop filled with specialized fluid. A pump circulates this liquid from a copper block on the CPU out to a large radiator cooled by dedicated fans.
Cooling System Type | Primary Benefit | Best Structural Application |
240mm AIO Radiator | Sleek case aesthetics | Mid-range processors mounted inside tight Micro-ATX chassis frames |
360mm AIO Radiator | Maximum heat dissipation | High-end unlocked enthusiast chips running intensive rendering or workstation tasks |
- The Thermal Advantage: Liquid cooling systems delay initial heat spikes by absorbing energy into the liquid loop, keeping your system quieter during short bursts of heavy work.
Thermal Paste Basics
Thermal paste is a specialized, heat-conductive gel that fills the microscopic air gaps between the smooth metal top of your processor and the bottom of your cooler block.
Step | Component | Role |
1. Source | CPU Die Surface | Generates high operational heat. |
2. Interface | Thin Layer of Thermal Paste | Fills microscopic surface imperfections to maximize contact. |
3. Receiver | Cooler Base Plate | Draws heat away into the cooling solution. |
- Application Method: Place a pea-sized drop or an "X" shape of thermal paste right in the center of the clean processor metal top before mounting the cooler.
- The Golden Rule: Never leave the clear plastic protective sticker on the bottom of your aftermarket cooler block—forgetting to peel it off completely blocks heat transfer and will cause your PC to overheat and crash instantly.
Step 9 – Plan Optimal Airflow and Fan Configuration
An optimal case fan layout prevents pools of stagnant hot air from baking your internal hardware components. Properly configuring fan directions ensures a steady supply of fresh room air cools your graphics card and processor under maximum gaming loads.
Intake vs Exhaust Fans
Case fans push air in a single direction, determined by the orientation of the physical fan frame blades. You must orient each fan correctly during installation to establish an intentional directional wind tunnel inside your computer casing.
- Intake Configurations: The open, clean side of the fan blades must face outward to pull cool air into the case. These fans should always use a removable fine mesh dust filter.
- Exhaust Configurations: The rear structural plastic X-brace frame side points in the direction the air is flowing. Position these fans at the back and top to push hot ambient air out.
Positive Air Pressure
Positive air pressure occurs when your intake fans force a higher volume of air into the case than your exhaust fans can push out. This configuration represents the ideal setup for residential computer builds in dusty environments.
- Dust Prevention: Excess internal air pressure forces its way out through every tiny unsealed gap and crack in the case panels. This outward flow prevents ambient room dust from settling inside.
- How to Achieve It: Install more intake fans than exhaust fans, or run your front intake fans at a slightly faster speed profile than your rear exhaust fans.
Negative Air Pressure
Negative air pressure occurs when your exhaust fans eject air out of the case faster than your intake fans can pull fresh air in. This setup creates a partial internal vacuum that pulls air into the chassis from any open opening.
- Dust Accumulation: A negative vacuum sucks unfiltered room dust inside through empty rear PCIe slots and panel seams. This leads to rapid dust buildup on your circuit boards within weeks.
- Cooling Impact: While negative pressure can sometimes lower graphics card temperatures slightly in restrictive cases, the rapid dust accumulation requires frequent internal cleanings.
Best Fan Placement Layouts
A classic directional wind tunnel layout remains the absolute safest configuration framework for standard desktop computer systems.
Stage | Chassis Location | Action | Thermal Impact |
Intake | Front Panel (3 Fans) | Draws in ambient room air | Lowers internal ambient temperatures |
Exchange | Core Hardware Zone | Passes air over CPU & GPU | Transports heat away from components |
Exhaust | Rear & Top Panels (3 Fans) | Forces hot air out of the case | Prevents thermal throttling |
- The Mainstream Standard: Install three 120mm intake fans along the front panel and one 120mm exhaust fan at the back. Add two extra exhaust fans on the top panel if you use a liquid cooling radiator.
- The Aquarium Layout: For dual-glass cases, place three intake fans along the bottom panel to feed cool air directly into the graphics card, paired with side intakes and top-mounted exhausts.
How to Check Full PC Compatibility Before Purchasing
Verifying hardware compatibility before swiping your card avoids the frustration of parts not fitting or failing to boot during assembly. You must cross-reference official manufacturer specification sheets to ensure physical sizes, electrical connections, and internal firmware versions match perfectly.
CPU and Motherboard Compatibility
Your chosen processor must physically and electronically match the motherboard socket layout and chipset architecture generation.
- Physical Socket Match: Ensure your CPU socket matches the motherboard socket design. For instance, an AMD Ryzen 9000 processor requires an AM5 socket motherboard, while an Intel Core Ultra 200S processor demands an LGA1851 socket.
- Chipset Compatibility: Verify that the motherboard chipset version actively supports your specific generation of processor. Some older budget motherboards may fit the physical socket but require a firmware update to recognize newer chips.
RAM Compatibility
System memory modules use distinct physical notches and operational voltages for each generation, preventing cross-compatibility.
- Generation Lock: You cannot install DDR4 memory modules into a modern DDR5 motherboard slot, or vice versa. The physical slots are completely different.
- Motherboard QVL Verification: Check the motherboard manufacturer's official Qualified Vendor List (QVL) on their website. Buying a memory kit explicitly tested and approved on that list guarantees your system will boot smoothly at rated speeds.
GPU Length Clearance
Modern high-performance graphics cards feature large cooling shrouds and three-fan arrays that can physically hit front case panels or water cooling radiators.
Metric Component | Measurement | Impact on Installation |
Max Chassis GPU Length | 350mm | Absolute total physical space from rear to front bracket |
Front AIO Radiator | 30mm | Space lost to liquid cooling hardware |
Actual GPU Clearance Limit | 320mm | Maximum length your graphics card can safely be |
- The Math: Look up the official graphics card length in millimeters on the manufacturer's spec sheet. Compare this value to the maximum GPU clearance listed under your computer case specifications.
- Radiator Headroom: If you plan to mount a liquid cooling radiator along the front panel of your case, subtract roughly 30 to 50 millimeters from the total available case length to account for the thickness of the radiator and fans.
CPU Cooler Height Clearance
Large tower air coolers use tall aluminum cooling towers that can prevent your tempered glass side panel from closing if your case is too narrow.
- The Check: Cross-reference the total vertical height of your air cooler (measured from the copper base to the tips of the heat pipes) against the "Max CPU Cooler Height" listed in your case specifications.
- RAM Clearance: Extra-tall RGB memory sticks can sometimes hit the underside of large dual-tower air coolers. Look for coolers featuring a recessed cutout or asymmetric design to provide plenty of room for your memory modules.
PSU Compatibility
Your power supply must match the physical mounting rails of your computer case and provide the correct modern power connectors for your graphics hardware.
Power System Parameter | Standard Specification | Compatibility Requirement |
Physical Form Factor | Standard ATX Power Supply | Enclosure must support standard ATX length configurations |
GPU Power Protocol | ATX 3.0 or ATX 3.1 Standard | Must include a dedicated 12VHPWR 16-pin cable for modern graphics cards |
BIOS Requirements
A motherboard can physically fit a processor but still refuse to turn on if its internal Basic Input/Output System (BIOS) firmware does not recognize the CPU code.
- The Issue: Motherboards manufactured before a new processor line hits the market require a firmware flash to recognize and run the new chip.
- The Solution: Prioritize motherboards that feature a physical BIOS Flashback button on the rear input/output panel. This feature allows you to update the system firmware using a simple USB thumb drive without needing to install an older processor first.
Recommended PC Builds for Different Budgets in Bangladesh
Choosing components that maximize your performance per Taka requires dividing hardware configurations into distinct budget brackets. These real-world component combinations are structured around localized price ranges from the PCB Store PC Builder Tools to account for ongoing market fluctuations.
Entry-Level PC Build
- Target Budget Range: 34,000 - 36,000 BDT
- Primary Use Case: Smooth office multi-tasking, online freelancing, school projects, and everyday tasks.
This foundational setup delivers highly stable operational speeds for budget-conscious users by pairing a reliable processing chip with an integrated display system.
- Processor (CPU): AMD Ryzen 5 3400G (with Radeon RX Vega 11 Graphics)
- Motherboard: MSI B450M-A PRO MAX II AM4 ATX Motherboard
- Memory (RAM): APACER NOX 8GB DDR4 3200MHZ GAMING Desktop RAM
- Storage Drive: Transcend 250GB 115S NVMe M.2 2280 PCIe Gen3x4 Internal SSD
- Computer Case & Power Supply: T-Wolf Phantom X4 RGB M-ATX Mid Tower Gaming Casing With 200W PSU
Budget Gaming PC Build
- Target Budget Range: 77,000 - 80,000 BDT
- Primary Use Case: High-frame-rate competitive 1080p gaming and introductory digital editing workflows.
This tier introduces a dedicated graphics card config to smoothly handle modern 3D gaming pipelines without exhausting your pocket.
- Processor (CPU): AMD Ryzen 5 5600 Desktop Processor
- Motherboard: MSI B550M-A PRO DDR4 AM4 Micro ATX Motherboard
- System Cooler: DEEPCOOL AK400 SINGLE TOWER CPU Cooler (Black)
- Memory (RAM): APACER NOX 16GB DDR4 3200MHZ GAMING Desktop RAM (2x8GB)
- Storage Drive: Kingston NV3 500GB Gen4 NVMe M.2 2280 SSD
- Graphics Card (GPU): Unika Radeon RX 580 BLIZZARDS 8GD5 V2 Graphics Card
- Power Supply: 1STPLAYER DK 5.0 PS-500AX 500W Non Modular Power Supply
- Computer Case: Maxcool Inferno MC5 Micro ATX Gaming Case with 5x ARGB Fan
Mid-Range Gaming PC Build
- Target Budget Range: 105,000 - 110,000 BDT
- Primary Use Case: High refresh rate 1080p gaming, entry-level 1440p settings, and smooth streaming workloads.
This ecosystem advances into the modern AM5 computing platform and high-speed DDR5 memory architecture to lock in exceptional longevity.
- Processor (CPU): AMD Ryzen 5 7500F Desktop Processor
- Motherboard: MSI PRO B650M-B AM5 M-ATX Motherboard
- Memory (RAM): Kingston FURY Beast Non RGB 16GB 6000MHz CL36 DDR5 Desktop RAM
- Storage Drive: Kingston NV3 500GB Gen4 NVMe M.2 2280 SSD
- Graphics Card (GPU): SPARKLE Intel Arc B570 Eclipse OC 10GB DDR6 Graphics Card
- Power Supply: Acer AC-550 550W 80+ Bronze Full Modular Power Supply
- Computer Case: 1STPLAYER MV5-TP ARGB Gaming Casing (White)
High-End Gaming PC Build
- Target Budget Range: 140,000 - 145,000 BDT
- Primary Use Case: Fluid 1440p AAA gaming configurations and high-speed digital content production.
An expansive high-performance build engineered around high-density tracking lanes and a heavy-duty cooling tower array to optimize framerate stability.
- Processor (CPU): AMD Ryzen 7 7700 Gaming Processor
- Motherboard: MSI PRO B650M-P DDR5 AM5 MATX Motherboard
- System Cooler: Thermaltake TOUGHAIR 710 Dual-Tower CPU Air Cooler
- Memory (RAM): Kingston FURY Beast Non RGB 16GB 6000MHz CL36 DDR5 Desktop RAM
- Storage Drive: Corsair MP600 GS 500GB Gen4 NVMe M.2 2280 SSD
- Graphics Card (GPU): Manli Nebula GeForce RTX 5060 8GB GDDR7 Graphics Card
- Power Supply: Acer AC-650 650W 80+ Bronze Full Modular Power Supply (Black)
- Computer Case: 1STPLAYER BV7 ATX Mid Tower Gaming Casing
Content Creation PC Build
- Target Budget Range: 255,000 - 262,000 BDT
- Primary Use Case: Pro 4K video editing loops, intricate rendering arrays, and long data compiles.
A creative heavy-lifter focusing heavily on extended VRAM allocations and immense data transfer speeds to handle demanding background workflows.
- Processor (CPU): AMD Ryzen 7 7800X3D Desktop Gaming Processor
- Motherboard: MSI B850 GAMING PLUS WIFI7 AM5 ATX Motherboard
- System Cooler: Thermalright Frozen Horizon 360 BLACK ARGB CPU Cooler
- Memory (RAM): Kingston FURY Beast Non RGB 32GB 6000MHz CL36 DDR5 Desktop RAM (2x16GB)
- Storage Drive: Corsair MP600 PRO XT 1TB M.2 NVMe PCIe Gen 4x4 SSD
- Graphics Card (GPU): MSI GeForce RTX 5060 Ti 16G SHADOW 2X OC PLUS 16GB GDDR7 Graphics Card
- Power Supply: 1STPLAYER NGDP ATX 3.1 GOLD 750W Full Modular Power Supply
- Computer Case: Revenger AIR TANK BTF 4 ARGB Infinity Fan ATX Curved Gaming Casing (Black)
Professional Workstation Build
- Target Budget Range: 720,000 - 760,000 BDT
- Primary Use Case: Local AI machine learning training matrices, high-fidelity Blender simulations, and enterprise structural data crunching.
An absolute powerhouse setup utilizing the maximum limits of current desktop architecture components for rendering pipelines and massive production tasks.
Component Slot | Selected Hardware Model | Key Performance Feature |
Processor (CPU) | AMD Ryzen 9 9950X3D Gaming And Content Creation Processor | Heavy compute threads with advanced 3D V-Cache caching layers |
Motherboard | Asus Rog Crosshair X870E Hero Am5 Atx Motherboard | Extreme enthusiast power tracking layout for stable data pipelines |
Graphics Card (GPU) | Asus Rog Astral Geforce Rtx 5080 16GB Gddr7 Oc Edition | Next-gen high-bandwidth visual processing and heavy tensor core calculations |
System Cooler | Asus Rog Ryuo Iv Slc 360 Argb 360Mm Aio Liquid Cpu Cooler | Premium liquid thermal cooling array featuring customizable metrics display |
Memory (RAM): Kingston Fury Beast Rgb 32GB Ddr5 6000Mhz Desktop Ram (2x16GB)- Storage Drive: Kingston Fury Renegade 2TB Gen4 Nvme M.2 2280 Ssd
- Power Supply: 1Stplayer Ngdp Atx 3.1 Platinum 1300W Full Modular Power Supply
- Computer Case: Asus Rog Strix Helios Ii Gx601S Mid-Tower Atx Gaming Case (Black)
Powered by the Industry-Standard PC Builder Tool
Every single build configuration listed in this framework has been systematically generated and verified using the official PCB Store Custom PC Builder Tool. Widely recognized as the definitive benchmark platform by hardware enthusiasts, local reviewers, and custom builders across Bangladesh, this intelligent configurator serves as the country's go-to system design engine. The tool is celebrated for delivering the absolute best real-time hardware matching output, ensuring that every selected part aligns mathematically with local availability and real-time market updates. By filtering your build components through this standard-setting portal, you eliminate the risk of parsing outdated international data sheets and secure a rock-solid configuration optimized specifically for the Bangladeshi consumer landscape.
Step-by-Step PC Assembly Guide
Assembling your desktop hardware components requires careful physical handling and a logical installation order. Following this structured walkthrough prevents accidental mechanical strains and guarantees that every connection locks perfectly into place on your first try.
Preparing Your Workspace
Before unboxing your expensive components, you need to set up a clean, static-free workspace to avoid damaging your hardware.
- Surface Selection: Assemble the computer on a large wooden or plastic table. Avoid working on carpets or rugs, which can build up static electricity that fries microchips.
- Tool Check: Gather a long magnetic-tip Philips #2 screwdriver, small zip ties or velcro straps, and a pair of small scissors or flush cutters.
- Preparation Steps: Lay down your motherboard box on the table—it serves as an excellent, non-conductive cardboard test bench for the first half of your assembly.
Installing the CPU
Mounting the processor requires absolute precision. Forcing the chip into the socket incorrectly can instantly bend or break the delicate physical pins.
Step 1 - Open the Motherboard Socket:
Push the metal load lever down and slightly outward to release it, then lift the socket bracket arm all the way up.
Step 2 - Align the Triangle Markers:
Find the tiny gold triangle printed on the corner of your processor chip. Match it up with the matching triangle icon stamped onto the corner of the physical motherboard socket.
Step 3 - Lower the Processor in Place:
Hold the processor exclusively by its outer edges. Drop it straight down into the socket gently. Never press down or apply force—the chip must slide into place completely on its own weight.
Step 4 - Lock the Metal Bracket:
Push the metal retention arm back down to its original spot and hook it beneath the catch clip. The black protective plastic socket cover will automatically pop off on its own during this step—save this cover for future warranty returns.
Installing RAM
Installing system memory before mounting your massive CPU cooler ensures you have plenty of room to push the modules firmly into their slots.
- Slot Selection: If you are installing two memory sticks, place them in slots A2 and B2 (typically the second and fourth slots moving outward from the CPU). Check your motherboard manual to verify this configuration.
- Process: Click open the plastic retention tabs at the top and bottom of the chosen memory slots. Align the physical plastic gap in the middle of the RAM stick with the matching ridge inside the motherboard slot.
- Locking: Press down firmly on both outer edges of the memory stick simultaneously until you hear a distinct, crisp click sound as the retention tabs snap shut automatically.
Installing SSD
Modern NVMe solid-state drives mount flat directly onto the motherboard circuit board, entirely eliminating the need for messy data cables.
Step | Action Required | Pro-Tip / Warning |
Step 1 | Insert M.2 SSD at a 30-Degree Angle | Don't force it straight down; let it slide into the slot pins naturally. |
Step 2 | Press the drive flat | Apply light pressure at the edge until it rests on the motherboard standoff. |
Step 3 | Secure with screw or toolless latch | Don't over-tighten the screw; snug is enough to prevent it from popping up. |
- Remove the Heatsink: Unscrew the decorative metal M.2 thermal heatsink plate located just below the primary CPU socket zone.
- Angle Insertion: Slide the gold contacts of your NVMe M.2 drive straight into the open M.2 slot at a shallow 30-degree angle until it stops.
- Secure the Drive: Push the drive down flat against the stand-off post. Secure it using the tiny included motherboard screw, or slide the toolless plastic rotating latch closed. Peel the plastic film off the thermal pad beneath the metal heatsink before screwing the plate back down.
Mounting CPU Cooler
Your cooler requires proper, balanced pressure against the processor's metal top to transfer heat effectively and prevent overheating.
- Prep the Base: If you are using an aftermarket cooler, check the bottom of the cooling block and peel off any clear protective plastic warning stickers.
- Apply Thermal Paste: Skip this step if your cooler has grey thermal paste pre-applied on the bottom. Otherwise, squeeze a pea-sized dot of thermal paste directly onto the exact center of your installed processor.
- Tighten Down: Line up the cooler's mounting brackets over the motherboard standoffs. Tighten the securing screws using an alternating "X" pattern—turn each screw a couple of times before moving to the opposite corner. This distributes pressure evenly across the processor chip.
Installing Motherboard
Mounting the motherboard requires making sure all back-panel ports align perfectly with the rear opening of your computer case.
- Install Stand-Off Screws: Peer inside your computer case and verify that the brass stand-off risers are screwed into the matching hole layout for your motherboard size (ATX or Micro-ATX).
- Align Input/Output Ports: If your motherboard has a loose, separate silver I/O shield, snap it into the rear case cutout first. If your board features an integrated pre-installed shield, gently slide the motherboard into the case at an angle until the back ports clear the rear openings.
- Screw Down: Secure the motherboard onto the case standoffs using the dedicated screws included in your case accessory box. Tighten each screw until it is snug, but do not overtighten them, as this can crack the circuit board.
Installing PSU
Placing your power supply unit into its lower basement compartment early gives you plenty of room to route your main power lines before the bulky graphics card blocks access.
PSU Installation Step | Action Detail | Critical Checkpoint |
Orient the Fan | Position the main intake fan facing downward | Ensure the bottom case ventilation intake dust filter is clear |
Secure the Frame | Screw four case screws into the rear mounting brackets | Ensure the physical power box does not wobble inside the chassis basement |
Thread the Cables | Push the thick cable bundles forward into the front routing holes | Pull your necessary connectors through while keeping unused cables bundled in the basement |
Installing Graphics Card
The heavy graphics expansion card must always go into the very top PCIe x16 slot on your motherboard. This slot connects directly to the processor's high-speed data lanes to prevent performance bottlenecks.
- Clear Case Backplates: Unscrew and remove the two metal expansion slot covers on the back of your computer case that line up with the top motherboard PCIe slot.
- Open the PCIe Slot Latch: Push down gently on the plastic locking tab at the far end of the motherboard PCIe slot until it clicks open.
- Seat the Card: Align the gold connection contacts of your graphics card with the open slot. Push down firmly until the card slides fully into the slot and the plastic motherboard latch snaps upward into place.
- Secure to Case: Drive the metal screws back into the rear case bracket to hold the heavy graphics card weight securely, preventing sagging.
Connecting Power Cables
Your hardware parts will not turn on unless every primary power delivery cable from your power supply unit is securely plugged in.
Cable Type | Connection Target | Primary Function |
24-Pin Connector | Right edge of the motherboard | Powers the main circuitry, PCIe slots, and chipset |
8-Pin EPS Cable | Top left of the motherboard | Delivers dedicated power directly to the processor cores |
PCIe / 12VHPWR Cable | Directly into the graphics card (GPU) | Powers the high-draw graphics processing system |
- The 24-Pin Main Cable: Connect the massive, thick 24-pin cable bundle into the long vertical slot along the right edge of your motherboard. Press down firmly until the plastic clip snaps shut.
- The 8-Pin CPU Cable: Route the 8-pin EPS power cable up behind the motherboard tray and plug it into the top-left corner slot to feed power to your processor cores.
- The GPU Power Cable: Run standard 8-pin PCIe cables (or the new 12VHPWR 16-pin cable for modern graphics cards) up to your graphics card. Ensure these connections click into place securely—loose graphics connectors can overheat and melt under load.
Front Panel Connections
Connecting these tiny, individual front-panel wires lets your case's physical power button, reset switch, activity LEDs, and audio jacks talk to the motherboard.
- The F_PANEL Cluster: Find the cluster of tiny pins located along the bottom right edge of your motherboard.
- Pin Alignment: Carefully slide the tiny individual 2-pin connectors (labeled Power SW, Reset SW, HDD LED, and PLED) onto their matching pins. Follow the diagram printed directly on the circuit board or inside your motherboard manual exactly, ensuring the positive (+) and negative (-) wires match.
- USB Ports: Plug the wide, blue-colored USB 3.0 header and the smaller, flat USB-C front-panel cable into their matching motherboard sockets.
Cable Management
Properly organizing your internal cables behind the motherboard tray improves air circulation inside the case and makes future hardware upgrades much easier.
- Pull Slack Out: Pull any excess cable slack out from the main front chamber back into the hidden space behind the rear side panel.
- Bundle and Tie: Group matching wires together along the integrated routing channels. Secure these bundles using velcro strips or plastic zip ties screwed down to the case anchor loops.
- Clear Fan Paths: Double-check the main front chamber to ensure no loose fan cables or power lines are dangling near your case fan blades or CPU cooler fins.
First Boot Checklist After Building Your PC
Completing the physical assembly of your computer leads directly to your very first system boot check, commonly known as the POST phase. This initial software configuration ensures that your installed hardware is recognized correctly, your memory runs at its advertised speeds, and your cooling systems operate within safe thermal limits.
POST Verification
Power On Self Test (POST) is an automated diagnostic routine your motherboard runs the moment you press the power button to verify all core components are functioning.
- The Indicator Check: Watch the top-right corner of your motherboard for the EZ Debug LEDs (labeled CPU, DRAM, VGA, BOOT). If a light stays stuck on, it indicates a hardware initialization issue with that specific component.
- The Display Target: If the POST completes successfully, the motherboard will pass the hardware check and send a video signal to your monitor, displaying a screen that reads "Press DEL or F2 to enter Setup."
- Troubleshooting Step: If your screen stays completely black, verify that your display monitor cable is plugged directly into the ports on your dedicated graphics card, rather than the motherboard ports.
BIOS Setup
The Basic Input/Output System (BIOS) serves as the primary configuration menu where you manage your low-level hardware settings and system boot rules before loading an operating system.
Step | Action | What to Look For / Common Issues |
Power | Press Power Button | Ensure your monitor is turned on beforehand so you don't miss the splash screen. |
Trigger | Repeatedly Tap DEL or F2 | Note: Some pre-built systems (like HP, Dell, or Lenovo) may use F1, F10, or F12 instead. |
Success | Enter Motherboard BIOS Screen | If you see the Windows loading circle, you were a second too slow. Restart and try again! |
- Accessing the Menu: Turn on your computer and repeatedly tap the Delete or F2 key on your keyboard until the main motherboard manufacturer configuration utility opens.
- Component Inventory: Look over the main dashboard screen to confirm the system correctly identifies your exact processor model, total storage drive slots, and full memory capacity.
- F-Lock Toggle: Switch the BIOS view from the basic "Easy Mode" layout over to the "Advanced Mode" layout by pressing the F7 key to unlock full configuration options.
Enable XMP or EXPO
High-performance memory kits automatically default down to slow baseline speeds when first installed to ensure absolute system boot compatibility. You must manually turn on the manufacturer's performance profiles inside the BIOS to run your memory at its advertised retail frequencies.
Platform Type | Memory Profile Standard | Expected Performance Impact |
Intel Core Systems | XMP (Extreme Memory Profile) | Instantly bumps baseline memory up to rated speeds (e.g., 5200MHz to 6000MHz) |
AMD Ryzen Systems | EXPO (Extended Profiles for Overclocking) | Automatically configures tight memory frequencies and stable operational voltages |
Skipping this step leaves up to 15% of your system's gaming and rendering performance completely on the table, as the memory will run at slower factory safety speeds.
Configure Boot Drive
Setting your primary high-speed drive as the first target ensures your computer looks in the right place for an operating system install file when it restarts.
- Locate Boot Priority: Use your mouse to navigate over to the Boot configuration tab inside the advanced BIOS menu layout.
- Set the Order: Drag your fastest NVMe M.2 solid-state storage drive up to the number one spot in the priority list.
- Storage Mode: Ensure your storage controller mode is configured to AHCI / NVMe mode rather than legacy IDE configurations to maximize data transfer rates.
Temperature Monitoring
Before installing any software, it is vital to check your idle component temperatures to ensure your CPU cooler is mounted correctly and making good contact with the processor.
- Locate the Hardware Monitor: Open the Hardware Monitor or Smart Fan status screen inside your BIOS interface.
- CPU Idle Target: Your processor core temperatures should hover stably between 30°C and 45°C while idling inside the BIOS screen.
- The Thermal Warning: If you notice your CPU temperature rapidly climbing past 75°C while sitting completely idle, turn off the PC immediately. This indicates your cooler is not making proper contact, likely because you forgot to peel off the plastic protective sticker from the bottom of the cooling block.
Installing Windows and Essential Drivers
Once your custom desktop computer completes its initial hardware boot check, you must transition from the motherboard firmware to your main operating system environment. Installing clean, current-generation system platform drivers ensures your underlying silicon hardware works at full performance while maintaining complete system stability.
Windows Installation
Deploying a clean installation of Windows 11 requires a separate operational computer and a blank USB flash drive containing at least 8GB of storage capacity.
- Prepare the Media: Download the official Microsoft Media Creation Tool from a separate computer. Insert your blank flash drive and run the utility to write the latest Windows 11 installation files onto the drive.
- Boot the Installer: Insert your newly prepared bootable USB drive into a rear motherboard slot on your new computer. Turn the system on and tap your motherboard's boot menu hotkey (typically F11 for MSI, F8 for ASUS, or F12 for Gigabyte) to select your USB drive as the primary boot target.
- Format the Storage: Select your target language preferences, click "Install Now," and choose the "Custom: Install Windows only (advanced)" setup option. Highlight your unallocated NVMe solid-state storage drive, click "New" to create standard system partition schemes, and press next to begin copying system files.
Motherboard Drivers
Your fresh Windows installation utilizes generic fallback system controllers that limit the full bandwidth capabilities of your motherboard. You must manually download and install the latest factory drivers directly from your motherboard manufacturer's support webpage using your specific motherboard model name.
Driver Category | Operational Impact | Primary Benefit |
Chipset Driver | Unlocks core PCIe lane routines and power states | Optimizes core communication between components and the CPU |
LAN & Wi-Fi Card | Initializes onboard Ethernet and wireless antennas | Stabilizes network connectivity and ensures maximum internet bandwidth |
Audio Controller | Configures the onboard digital-to-analog converter (DAC) | Activates high-definition audio outputs and front/rear audio jacks |
- The Chipset Driver: Install the main system chipset driver bundle first. This software configures power management profiles and optimizes communication between your processor and core motherboard circuits.
- Network Infrastructure: Install the dedicated LAN and Wi-Fi controller files to guarantee stable, high-bandwidth internet connectivity without sudden connection drops.
- System Audio: Deploy the dedicated onboard audio software package to ensure high-definition sound processing runs cleanly through your front and rear case audio jacks.
GPU Drivers
Operating a modern graphics card on generic Windows display configurations locks your monitor resolution at low baselines and blocks high refresh rates. Installing the latest official graphics stack is mandatory to unleash real-time 3D rendering speeds and activate automatic upscaling features.
GPU Chipset Provider | Official Software Driver Utility | Crucial Feature Unlocked |
NVIDIA GeForce | NVIDIA App / GeForce Game Ready Driver | Activates DLSS Frame Generation and Real-Time Ray Tracing processing cores |
AMD Radeon | AMD Software: Adrenalin Edition | Enables FSR configuration trees and Anti-Lag frame delivery pacing |
Intel Arc | Intel Arc Graphics Driver | Configures XeSS upscaling support and optimizes modern AV1 video encoder hardware |
- The Clean Routine: Download the executable setup driver from your hardware provider's portal. Select the "Express Installation" path or opt for a clean install configuration to override old temporary display files.
Firmware Updates
Updating your motherboard's Basic Input/Output System (BIOS) firmware improves system memory compatibility, stabilizes power delivery, and patches security flaws discovered after the board was manufactured.
- Grab the File: Locate the exact product support page for your motherboard model and download the latest stable BIOS file. Avoid downloading "Beta" releases unless you need them for specific hardware support.
- Format a USB Drive: Extract the downloaded ZIP file and copy the main firmware file onto a clean USB flash drive formatted to the FAT32 file system.
- Flash the Firmware: Leave the USB flash drive plugged in and restart your computer directly into the BIOS screen. Click on the flashing utility (labeled M-Flash for MSI, EZ Flash for ASUS, or Q-Flash for Gigabyte), select your firmware file from the USB list, and confirm the update.
Critical Warning: Never turn off your computer or unplug the power line while a BIOS firmware update is processing. A sudden power loss during this step will corrupt the motherboard's firmware chip, rendering the computer completely unbootable.
Performance Testing Your New Build
Running systematic hardware stress tests validates that your physical assembly can handle maximum processing workloads without crashing, losing data, or overheating. Subjecting your new hardware to heavy computing cycles uncovers hidden assembly flaws—like loose cable connections or uneven cooler pressure—before you launch your daily programs.
CPU Stress Testing
A thorough processor stress test forces every physical core and execution thread to compute complex mathematical rendering routines under a continuous 100% calculation load. This immediate processing spike confirms that your motherboard voltage regulators can supply clean, steady electricity without triggering system blue-screen crashes.
- Primary Software Choice: Download and run Cinebench 2026 or Prime95 to handle heavy testing workloads.
- The Routine: Fire up the Cinebench multi-core stability loop and let it process continuously for a minimum 30-minute block.
- Evaluation Metric: Your desktop computer must render the heavy 3D testing scene repeatedly without locking up, lagging your cursor, or suddenly shutting down down to black screens.
GPU Stress Testing
Graphics stress testing pushes your graphics expansion board to pull its maximum specified power limits while validating real-time 3D polygon math calculations and high-speed memory pathways.
- Primary Software Choice: Use current versions of FurMark 2 or run the looped 3DMark Time Spy stability sequence.
- The Routine: Set FurMark 2 to run natively at your monitor's exact display resolution, keeping the rendering loop active for 20 to 30 minutes straight.
- Evaluation Metric: Watch the visual screen output closely for any green lines, flickering blocks, or random flashing pixels. These geometric visual glitches indicate unstable video memory chips or bad physical seating inside the motherboard slot.
Memory Testing
System memory data errors can corrupt vital operating system files, ruin game saves, and cause random system lockups during simple web browsing sessions.
Diagnostic Phase | Action Required | Expected Outcome |
Phase 1: Initialization | Boot from flashed USB drive | Bypasses the operating system to test RAM in a pure environment |
Phase 2: Execution | Run automated test matrix | Subject memory to 13 different algorithmic tests across multiple loops |
Phase 3: Analysis | Scan data lines for errors | A healthy system shows 0 errors. Any logged errors indicate physical hardware degradation or voltage instability. |
- Primary Software Choice: Utilize MemTest86 via a bootable flash drive, or run the lightweight TestMem5 utility within Windows.
- The Routine: Allow MemTest86 to process its full four-pass automated diagnostic loop across your system memory modules, which generally takes two to three hours to finish.
- Evaluation Metric: The total software error registry count must read exactly zero at the end of the test. Even a single recorded memory line error indicates an unstable XMP/EXPO speed calculation or a physically defective RAM stick.
Temperature Validation
You must actively track your internal microchip heat metrics during all system stress tests using dedicated hardware monitoring utilities to verify your cooling fans are working efficiently.
Hardware Component Zone | Target Safe Load Boundary | Critical Thermal Limit |
Processor Core (CPU) | Stably balances between 70°C and 85°C | Reaching 95°C+ triggers automatic performance drops to slow heat production |
Graphics Die (GPU) | Stably runs between 65°C and 80°C | Reaching 85°C+ indicates poor internal case airflow ventilation or restricted fan paths |
- Hardware Tracking Tool: Keep HWiNFO64 or HWMonitor open on your screen during all stress test runs to log your maximum temperature spikes, absolute power consumption limits, and active cooling fan RPM rotational velocities.
Most Common PC Building Mistakes Beginners Make
Assembling a desktop computer for the first time is a highly rewarding process, but a single simple mistake can lead to poor system performance, high operating temperatures, or even permanently fried hardware components. Reviewing the most common assembly pitfalls allows you to proactively avoid them, saving you time and protecting your hard-earned financial investment.
Incorrect PSU Selection
Buying an unbranded, low-quality power supply is one of the most dangerous mistakes a beginner can make. Many builders overspend on flashy RGB lighting or slightly faster processors, leaving them with a tight budget that forces them to settle for a cheap generic power unit.
- The Explosive Reality: Unbranded generic power supplies lack critical safety protective fuses like Overcurrent Protection (OCP) and Short Circuit Protection (SCP). During sudden voltage spikes or local load-shedding events, these cheap power units can explode, instantly frying your expensive motherboard, processor, and graphics card.
- The Missing Metric: Beginners often ignore modern power connectivity standards, accidentally purchasing older power units that lack the native ATX 3.0 or ATX 3.1 power standard. This means they miss out on the dedicated 12VHPWR high-power cable required to safely run current-generation graphics cards without connector melting risks.
Poor Airflow Planning
Assembling your hardware components into a computer case without planning an intentional directional wind tunnel results in pocketed heat zones that choke your performance.
Thermal Phase | Action / Environment | Resulting System Impact |
Restricted Intake | Solid glass panels block direct external air pathways | Static air volume inside the chassis |
Heat Accumulation | Internal case fans recycle trapped, radiant hardware heat | Case interior transforms into an oven environment |
Thermal Throttling | Critical 95°C limit is reached on CPU/GPU silicon | Clock speeds drop sharply to prevent permanent hardware damage |
- The Plastic Sticker Mistake: The most common oversight during assembly is forgetting to peel off the clear plastic protective sticker from the polished copper underside of an aftermarket CPU cooler block. Leaving this sticker on blocks heat transfer entirely, causing your processor to spike past 95°C and crash your PC within minutes of booting up.
- Backward Fan Mounting: Beginners frequently install all of their case fans facing the exact same direction, or accidentally configure them all as exhaust fans. This creates a severe internal vacuum that suffocates your components, rather than a proper front-to-back cool air stream.
Incompatible Components
Forcing physically or electronically incompatible parts together is an expensive mistake that can permanently damage the sensitive gold pin paths on your hardware.
- Motherboard Socket Mistakes: Assuming any processor can fit onto any motherboard is a massive pitfall. Forcing an AMD processor onto an Intel socket, or vice versa, will instantly bend and ruin hundreds of fragile motherboard pins, completely voiding your warranty.
- Physical Dimension Clearance: Many builders purchase massive triple-fan graphics cards and tall dual-tower air coolers without checking their case dimensions. This leads to frustrating situations where the graphics card hits the front case fans, or the side glass panel refuses to close because the air cooler stands too tall.
Forgetting BIOS Updates
A computer can be assembled perfectly with matching physical sockets but still refuse to boot up if the motherboard's internal firmware does not recognize the processor's architecture code.
Firmware Pitfall Scenario | The Structural System Result | The Simple Preventative Fix |
Mounting a current-gen processor onto an older-generation motherboard socket | The system stays stuck on a black screen with the CPU EZ-Debug LED lit up | Prioritize motherboards featuring a physical BIOS Flashback button to update the firmware using a simple USB drive without needing an older CPU |
Incorrect RAM Installation
System memory modules must be installed in a very specific slot configuration and manually tuned within the firmware to deliver their full advertised operating speeds.
- The Single-Channel Stutter: Installing two memory sticks right next to each other in slots one and two bypasses the motherboard's dual-channel wiring. This accidental mistake cuts your system's memory bandwidth in half, leading to noticeable frame drops and stuttering during intensive gaming sessions.
- Leaving Speed Unlocked: Forgetting to enter the motherboard BIOS screen to manually toggle the XMP or EXPO performance profile leaves your memory running at slow baseline safety speeds, leaving up to 15% of your system's processing performance completely unused.
Future-Proofing Your PC Build
Future-proofing your desktop configuration means purchasing adaptable hardware platforms that can accept next-generation component upgrades without requiring you to replace your entire computer. Strategically adding system power headroom, sizing up your chassis clearance, and selecting modern core chip sockets extends your setup's operational lifespan well past five years.
Choosing Upgrade-Friendly Platforms
The baseline motherboard socket platform you purchase directly dictates whether you can swap in faster processors down the road without buying an entirely new motherboard and memory kit.
- AMD AM5 Longevity: AMD formally guarantees hardware support for its AM5 socket platform through 2029. This long runway means an AM5 motherboard bought today can natively accept future processor generations with a simple, free BIOS update.
- Intel LGA1851 Status: Intel fields the LGA1851 socket for its Core Ultra series desktop chips. Historically, Intel restricts socket lifecycles to just one or two processor lines, meaning your next major CPU jump will likely require a brand-new motherboard layout.
- The Memory Lock: Prioritize exclusive DDR5 motherboard designs over older legacy platforms to ensure your system memory modules remain fully reusable across future computing eras.
Extra PSU Headroom
Your power supply unit operates most efficiently when system power demands hover around 50% of its total rated capacity. Purchasing extra wattage headroom keeps your computer stable when you install power-hungry components later.
Metric / Scenario | Baseline System | Upgraded System (650W PSU) | Upgraded System (850W PSU) |
Power Draw | 400W | 650W | 650W |
PSU Capacity | 650W | 650W | 850W |
Available Headroom | 250W (Safe) | 0W (Critical) | 200W (Ideal) |
System Behavior | Stable | Triggers Shutdowns / Crashes | Stable & Highly Efficient |
- The Upgrade Cushion: If your initial processor and graphics configuration draws 450 watts, opting for a 750W or 850W power supply instead of a bare-minimum 550W unit gives you the flexibility to drop in a top-tier graphics card later.
- The Smart Connector Standard: Ensure your chosen power supply natively supports the ATX 3.0 or ATX 3.1 protocol. This guarantees the unit includes a dedicated high-power 12VHPWR connection cable to handle the intense power spikes common in next-gen graphics hardware.
Expansion Slot Planning
A motherboard with plenty of open expansion routing lines allows you to add extra hardware accessories to your desktop machine as your personal workflow demands grow.
- PCIe 5.0 Readiness: Select a motherboard chipset that supplies native PCIe 5.0 lanes directly to both the primary graphics slot and the top M.2 storage drive bay, securing full compatibility with upcoming high-speed expansion hardware.
Newegg - Peripheral Slots: Ensure your motherboard provides at least one extra open PCIe x4 slot below your main graphics card to house dedicated add-in expansion hardware.
Expansion Card Class | Primary Functional Benefit | Long-Term Workflow Impact |
Dedicated Capture Card | Captures uncompressed high-definition video inputs | Enables smooth game streaming or multi-camera recording streams |
10-Gigabit Network Card | Accelerates local network file transfers | Allows instant backups over ultra-fast office server storage arrays |
Storage Expansion Planning
Modern operating systems, heavy production software suites, and modern game installations grow larger every year, making extra storage capacity a necessity.
- Count Your M.2 Slots: Avoid buying cheap motherboards that feature only one single M.2 storage slot. Prioritize mainstream boards that provide three to four integrated M.2 slots, allowing you to add extra solid-state drives over time.
- High-Density Modules: When building your computer, fill an open slot with a single high-capacity 1TB or 2TB NVMe solid-state drive rather than splitting your initial budget across two small 512GB drives. This leaves plenty of empty physical slots open for quick future storage expansion.
Where to Buy PC Components in Bangladesh
Sourcing hardware parts through verified channels protects you from buying counterfeit stock and guarantees access to local after-sales support frameworks. Navigating the local tech marketplace requires choosing enthusiast-focused suppliers that combine strict consumer warranty standards with expert component compatibility advice.
Understanding Authorized Warranty
Purchasing desktop hardware through authorized distributor pipelines shields your consumer budget if an internal component suffers spontaneous electrical failure.
- Official Local Support: Authorized retail warranties give you direct access to official service center replacements. This skips the endless delays common with unverified grey-market imports.
- Replacement Timelines: Official components include clear vendor repair and replacement paths, reducing your waiting times from months down to a few business days.
Checking Product Authenticity
The local computer market deals with an influx of refurbished storage drives and expertly repackaged components sold as brand-new hardware.
- The Security Routine: Always verify that the unique physical serial number sticker printed on the hardware component matches the label on the outer retail box exactly.
- Digital Authentication: Use your phone to scan the distributor’s holographic security label or scratch-off QR code on the spot to confirm the product's authenticity before leaving the shop counter.
Importance of Local Technical Support
Assembling complex, high-power desktop hardware configurations occasionally brings up frustrating initial hardware startup anomalies that require dedicated in-person troubleshooting.
- Hands-on Diagnostics: Local diagnostic desks can quickly swap out parts to isolate a bad component, saving you the headache of testing things yourself without extra hardware.
- Component Protection: Having a certified technician handle complex component physical seating steps protects your fragile motherboard socket pins from getting accidentally bent.
Component Compatibility Assistance
Choosing a dedicated hardware supplier grants you access to tech-savvy agents who analyze your component selection sheets to prevent expensive hardware mismatch errors.
Component Slot Check | Retail Verification Value | Preventative System Benefit |
Processor vs Motherboard | Socket and Firmware Validation | Ensures your system completes POST smoothly on the very first try |
Graphics Card vs Chassis | Physical Length & Clearance Math | Prevents long multi-fan graphics card boards from slamming into front fans |
Availability of Current Generation Hardware
Top-tier component vendors prioritize rapid stock transitions, ensuring current-generation processing platforms and modern high-speed memory architectures land on shelves immediately.
- Direct Access: Skip the long delays of international shipping and find current-generation processors and high-bandwidth graphics expansion units right on local shelves.
- Platform Scalability: Sourcing your parts from current stock lines guarantees your motherboard chipsets can handle upcoming component drops over the next few years.
Why Many Builders Prefer Established PC Retailers Such as PCB Store
Enthusiasts and custom builders in Bangladesh heavily favor specialized, enthusiast-centric tech ecosystems like PCB Store rather than standard corporate multi-product retail chains.
- The Enthusiast Mindset: Founded and managed by true PC hardware enthusiasts, PCB Store treats every custom computer build as a unique, highly precise project. They focus deeply on optimal airflow balance, VRM thermal performance, and correct component scaling.
- Guaranteed Authenticity & Support: Shopping through PCB Store guarantees you get completely original, current-generation components. Every piece comes backed by a rock-solid authorized manufacturer warranty and industry-leading after-sales diagnostic support.
- Expert Solution Planning: Whether you are putting together a competitive high-FPS gaming rig, a professional 4K video editing platform, or a heavy-duty local AI workstation, their technical team provides tailored component advice. This ensures every Taka you spend goes directly toward raw performance stability.
Final Checklist Before Buying PC Parts
Running through a final validation checklist before finalizing your component purchases prevents costly buying mistakes and ensures your assembled system perfectly matches your target goals. Double-checking your hardware specifications, local warranty terms, and performance expectations saves you from the frustration of mid-assembly surprises at the component counter.
Compatibility Verification
You must systematically re-verify the physical dimensions and electrical requirements of your selected components using official manufacturer specification sheets.
- The Core Lock: Confirm your central processor model matches the motherboard socket design and chipset generation perfectly.
- Physical Clearances: Cross-reference the exact physical length of your graphics card in millimeters against your case's maximum GPU clearance space. Verify your CPU tower cooler height leaves at least 5 millimeters of clearance so your side tempered glass panel can close smoothly.
- Memory Check: Ensure your chosen memory modules match the generation requirement of your motherboard (DDR5 vs DDR4) and feature on the official Qualified Vendor List (QVL).
Warranty Verification
Navigating the local tech market requires verifying that every single component on your invoice is backed by an official, authorized local distributor warranty.
- Look for the Sticker: Check the outer retail box of your CPU, motherboard, and graphics card for the holographic sticker of the official local distributor. Avoid grey-market parallel imports that offer weak "shop-only" replacement promises.
- Match the Serial Numbers: Ensure the unique physical serial numbers printed on the hardware labels are typed out accurately on your final cash memo or purchase receipt.
- Know the Lifecycles: Verify your component warranty windows match standard industry guidelines before walking away from the counter.
Component Class | Standard Local Warranty Window |
Processor (CPU) & Motherboard | 3 Years Official Replacement Warranty |
Graphics Card (GPU) | 2 to 3 Years Official Replacement Warranty |
System Memory (RAM) | Product Lifetime Warranty Coverage |
Power Supply Unit (PSU) | 5 to 10 Years (Depending on 80 Plus Tier Class) |
Budget Review
A common pitfall for first-time builders is spending their entire budget on a premium processor or high-end graphics card, forcing them to settle for low-quality foundational components.
- Balance the Sheet: Never compromise on the quality of your power supply unit or motherboard voltage regulators to squeeze in a slightly faster graphics card. A cheap power supply threatens the life of your entire system.
- Account for Extra Costs: Ensure your total budget includes a comfortable margin for essential accessories like a magnetic tip screwdriver, zip ties, a localized power strip with surge protection, and your operating system license.
Upgrade Planning
Analyze your component selection to ensure your core platform can handle upcoming hardware generations without requiring a complete system tear-down.
- Check the Socket Lifecycle: Opting for an AMD AM5 motherboard ensures your system can drop in future processor generations with a free BIOS update.
- Sizing Up the PSU: Buying a power supply unit with an extra 150W to 200W of wattage headroom allows you to upgrade to a high-power graphics card down the road without replacing your power block.
- Leave Slots Open: Purchase a single high-capacity 1TB NVMe drive rather than two small 512GB drives, leaving empty M.2 slots open on your motherboard for quick future storage upgrades.
Performance Expectations
Align your hardware expectations with real-world, independent performance benchmarks rather than marketing hype or biased online opinions.
- Target Your Resolution: Ensure your graphics card tier is realistically paired with your monitor’s resolution and refresh rate. An entry-level graphics card will struggle at 1440p, while a top-tier enthusiast card is completely wasted on a basic 60Hz 1080p office display.
- Analyze the Workload: Prioritize multi-core processor performance if your daily routine involves heavy video editing or 3D rendering. Lean into high single-core boost clock speeds if your primary goal is maximizing gaming frame rates.